
Before debtor receipts can be issued, Receipt Types must first be set up in CodeMaint > Accounts Receivable. For full details relating to receipt types, see the System Setup Training Guide.

|
Before debtor receipts can be issued, Receipt Types must first be set up in CodeMaint > Accounts Receivable. For full details relating to receipt types, see the System Setup Training Guide. |
A receipt is a transaction that indicates that an invoice has had a payment made against it. Receipts can be entered in any currency that is attached to the Agent.
To insert a Debtors Receipt, first select the Debtor the Receipt is for, and then select Transactions in the side bar. Click on the Insert button  in the Button bar. From the Insert Transaction screen displayed, select Receipt.
In this example, two invoices are being receipted - one in USD and the other in NZD. Both are being paid with the same receipt.
Screen Shot 50: Debtors Receipt Header
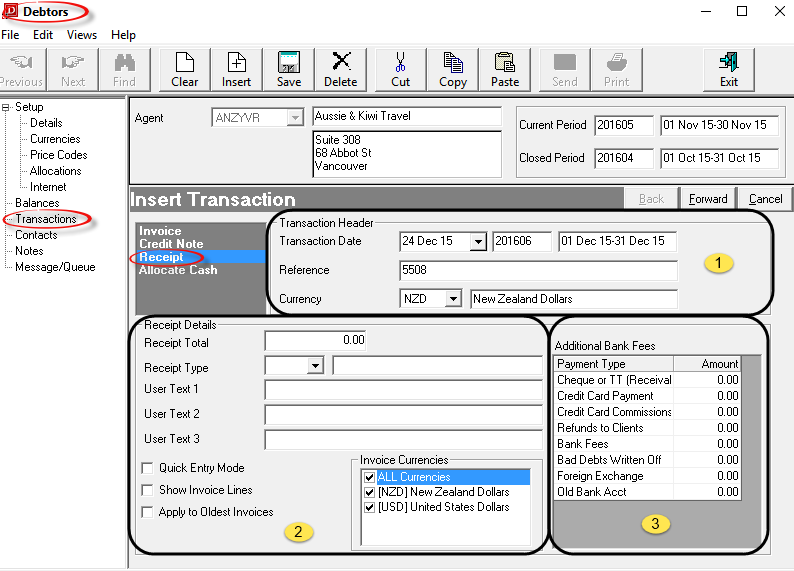
Transaction processing follows a wizard which leads through all of the required stages. The first screen as shown in Screen Shot 50 Debtors Receipt Header above is the Receipt Header and it contains the following fields:
 Transaction Header Section
Transaction Date (Date)
Receipts always default to current system date. The transaction period number which the transaction date is in displays to the right of the Date field, and the corresponding Start Date/End Date of the period display to the right of the period number. The Transaction Date can be overridden. Receipts always inherit the age period of the invoice to which they are applied. The Transaction Date must be in an open accounting period—the system will not allow a transaction date which is in a closed accounting period.
Reference (20 Chars)
The Receipt Number. This is sequentially allocated from the System INI setting AR_NEXT_RECEIPT. This field cannot be overridden unless the Debtors INI setting AR_MANUAL_RECEIPT is set to Y.

|
It is not recommended that the Reference field be accessed and reference numbers changed. The system will not allow the same reference number to be used more than once for the same transaction type for the same Agent. If manual referencing is permitted, the danger of this occurring increases. |
Currency (Drop-down)
The currency that the receipt will be issued in. This can be changed to any of the currencies that are attached to the agent. The currency which was checked as the default in the currencies screen during agent set up is the one which displays by default. (See Default Currency field under Debtors Application.)

|
A receipt can be issued in a currency which is different to the currency of the invoice that the receipt is being applied to. An example is shown under Receipt Currency Different to Invoice Currency. |
 Receipt Details Section
Receipt Total (Numeric, 11.2)
The total value of the cash received for the Agent that is being receipted.

|
A separate receipt is not required for each invoice that the receipt is paying. I.e., if the received amount is 10,000.00 paying 10 invoices of 1,000.00 each, only one receipt is required—the amounts can be applied individually to invoices in the next screen. |
Receipt Type (Drop-down)
When receipts are entered, a receipt type is applied to the transaction. The receipt type has two uses. It is used to identify the type of payment—e.g., Cheque/Telegraphic Transfer, Credit Card etc. and it can also have a General Ledger account attached to it which can re-direct part, or all of the debit side of the transaction (which is normally the Bank Account), to the account attached to the Receipt Type — e.g., some of the receipt applied to the Bank Fees expense account and the balance to Bank. Select the receipt type(s) applicable to the receipt.
User Text 1 – 3 (30 Char Each)
The labels for these three fields can be set up when the receipt type is set up. When a receipt type is selected here, the labels (if set up) display. Free format text can be entered into these fields (whether labelled or not).
Screen Shot 51: Receipt Type User Text Labels

Quick Entry Mode (Checkbox)
Quick entry receipt mode requires that the invoice number being paid is known. This setting can be changed in the next screen. The Debtors INI setting RECEIPTMODE can be used to set this checkbox on or off. See the example of .
Show Invoice Lines (Checkbox)
When checked, the lines within each invoice will be displayed in the invoice list scroll. This enables a receipt to be applied to a specific line in the invoice. This setting can be changed in the next screen. See the sample .
Apply To Oldest Invoices (Checkbox)
When checked, the amount specified in the Receipt Total field will automatically default against the oldest outstanding invoices. This amount and the invoices selected for updating can be edited. This setting can be changed in the next screen.
Invoice Currencies (Multi Select List Box)
Checking or un-checking specific currencies in this list determines whether invoices of the particular currency will display in the list of invoices available to receipt. This enables (e.g.) only USD invoices to display.

|
The agent currencies will only display here if the Debtors INI Setting AR_RECEIPT_MULTI_CURRENCY is set to Y. If this value is not set, then the currency selected in the Currency drop-down determines the currency of the invoices available to be receipted. |
 Receipt Type List
Although labelled 'Additional Bank Fees', this section displays the list of available Receipt Types.
Additional Bank Fees (List)
This is a list of available receipt types and enables multiple receipt types to be used for one receipt - e.g., when issuing a receipt for a receipt transaction that has attracted bank fees, the Cheque or TT receipt type would be selected in the Receipt Type field (section  ) and the amount of the bank fees entered alongside the Bank Fees receipt type in this list. (See Issue Receipt and Post Bank Fees Concurrently).
Screen Shot 52: Example Completed Receipt Header
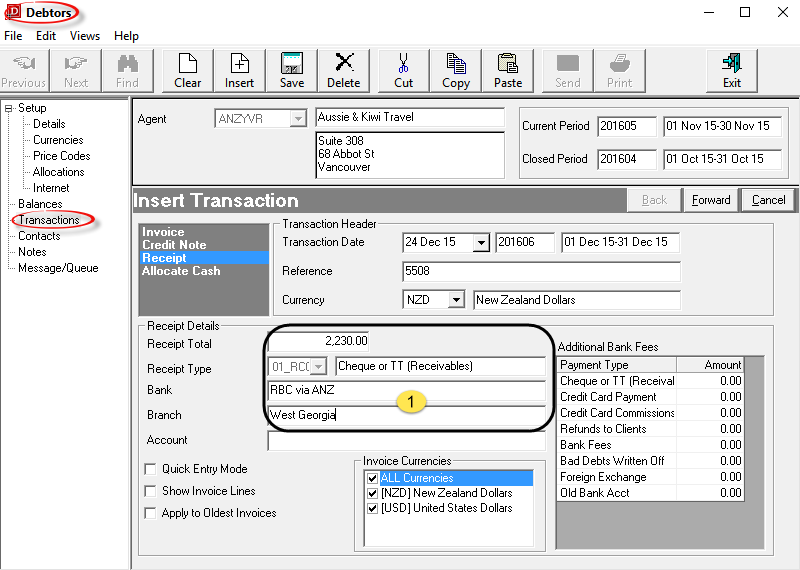
In Screen Shot 52 Example Completed Receipt Header above, the Receipt Total, Receipt Type and Bank Details ( ) have been completed.

|
Click the Forward Button on the Wizard Bar to continue. The New Receipt screen overlays the Insert Transaction Screen. |

|
Click the Cancel Button to cancel the Receipt. |

|
The columns which display in this scroll are dependent on the AR INI setting AR_RECEIPT_MULTI_CURRENCY. When Y, outstanding invoices of all currencies that were checked in the Multi Select List Box on the Receipter Header screen will display; when N only invoices of the Receipt Header currency will display. Screen Shot 53 New Receipt Invoice Scroll Screen – Multi Currency Invoices is the display when the INI setting is Y, and Screen Shot 54 New Receipt Invoice Scroll Screen – Single Currency Invoices |
Screen Shot 53: New Receipt Invoice Scroll Screen – Multi Currency Invoices
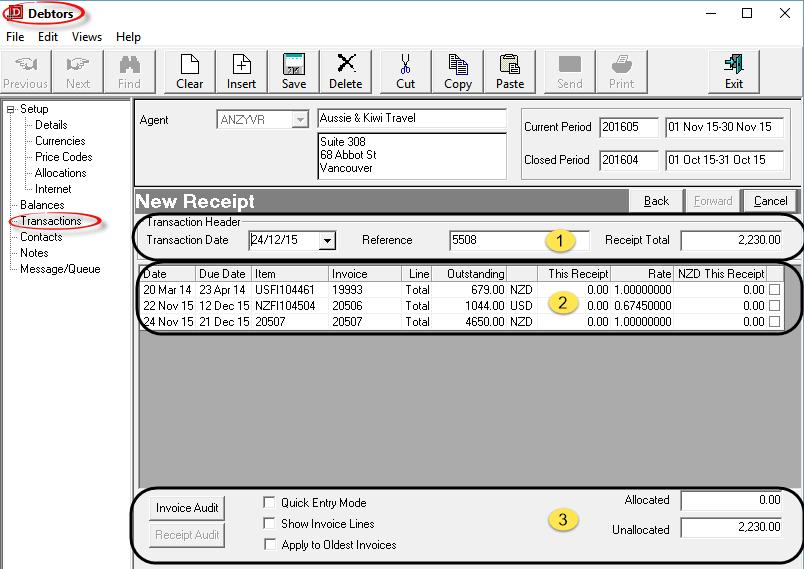
Screen Shot 54: New Receipt Invoice Scroll Screen – Single Currency Invoices


|
The column headings at the top of the scrolls are the only column headings available in these screens. |
The New Receipt screen has 3 distinct sections.
 Receipt Header Section
The details from the Transaction header screen default into this section of the screen.
Transaction Date (Date, Display Only)
The transaction date as entered or accepted in the receipt header screen.
Reference (Display Only)
The transaction (receipt number) reference as assigned in the receipt header.
Receipt Total (Numeric, 11.2)
The receipt total from the receipt header. The amount can be edited here.
 Transactions Available to Receipt
The column headings in this screen are:
Date (Display Only)
The invoice transaction date.
Due Date (Display Only)
The date the invoice was due to be paid. Calculated by the agent’s terms as entered in the Currencies Screen. (See Screen Shot 9 Completed Currencies Screen – Example 1 USD).
Item (Display Only)
For bookings generated invoices, this is the booking reference number. For Non-Bookings invoices, the invoice number.
Invoice (Display Only)
The invoice number.
Line (Display Only)
When the Show Invoice Lines checkbox is checked, the line numbers of the invoices will display in this column. Total indicates that the invoice total is displaying.
Multi-Currency Scroll
Outstanding (Display Only)
The invoice outstanding balance. The column to the right indicates the currency of the outstanding balance.
This Receipt (Display Only)
The amount applied against the invoice on this receipt. This field will update when a value is entered in the (CUR) This Receipt column.
Rate (Numeric, Max 20 of which 12 can be decimal)
The exchange rate displayed is from the Tourplan Currencies table and is the rate valid as at the date of the receipt. This field can be edited if the receipt is being applied to an invoice whose currency is different to the receipt currency.
(CUR) This Receipt
The NZD in the column heading indicates that this receipt is being issued in NZD. The values entered alongside each invoice being receipted must therefore be NZD amounts.
Checkbox Column
If the amount being applied to the invoice equals the amount in the Outstanding column, checking this box will automatically apply the outstanding amount to the invoice.
Single Currency Scroll
(CUR) Amount
The invoice value in the currency of the receipt header.
(CUR) Received
The value of any amount(s) already receipted against the invoice in the currency of the receipt header.
(CUR) This Receipt
The currency that this receipt is being issued in - NZD. The values entered alongside each invoice being receipted must be NZD amounts.
Checkbox Column
If the amount being applied to the invoice equals the amount in the Outstanding column, checking this box will automatically apply the outstanding amount to the invoice.
 Checkboxes/Buttons Common to Single/Multi Currency screens
Invoice Audit (Button)
Clicking anywhere on an invoice line and then clicking this button will display the details of the invoice. See Debtors Transaction Audit.
Quick Entry Mode (Checkbox)
This checkbox is where the setting from the Receipt Header screen can be changed. See the Quick Entry Receipt Mode example.
Show Invoice Lines (Checkbox)
This checkbox is where the setting from the Receipt Header screen can be changed. See the Receipt Individual Invoice Line(s) example.
Apply To Oldest Invoices
This checkbox is where the setting from the Receipt Header screen can be changed.
Allocated (Display Only)
The amount of the receipt total already allocated to invoices.
Unallocated (Display Only)
The amount of the receipt total not yet allocated to invoices.

|
If the Receipt Total has not been entered in the Receipt Header, then when amounts are applied against invoices here, the unallocated value will display as a negative figure in red. |
Screen Shot 55: New Receipt – Applied Amounts
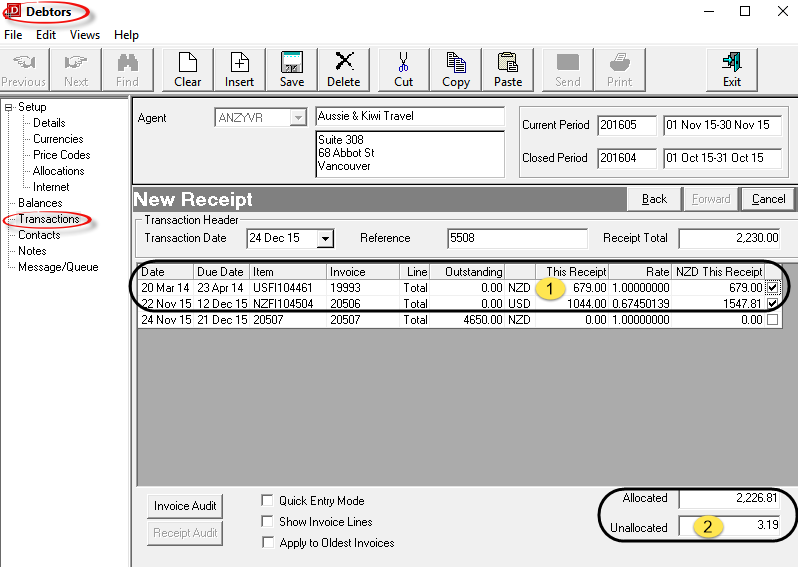
In the example in Screen Shot 55 New Receipt – Applied Amounts, the receipt total amount of 2300.00 NZD has been applied against 2 invoices - 19993 for NZD 679.00 and 20506 for NZD 1547.81 which at the exchange rate of 0.67450139 equates to the USD amount of 1044.000 ( ). There is still an unallocated amount 3.19 (
 ).
).

|
In this example, this is not an exchange rate gain, since the amount receipted against 20506 was in NZD - despite the fact the Invoice was in USD. In this case, the agent has sent an NZD amount and it slightly exceeds the NZD amount that was expected. |
This is going to be posted to 'Unallocated Cash', on the basis that the invoice number(s) that this amount applies to are unknown.

|
To continue, click the Save button in the Button bar. Because the total amount of the receipt has not yet been allocated, the Unallocated Cash options (as in Screen Shot 56 Unallocated Cash Dialogue) will display. If the total value of the receipt had been allocated, the Transaction List (Screen Shot 57 Transaction List Showing Receipt Transactions) displays. |

|
If any item on previous screens need correcting, use the Back button on them New Invoice bar. |

|
To cancel, click the Cancel button on the New Invoice bar. |
The Unallocated Cash function allows cash to be receipted without applying it to an invoice. This may appear to contradict the statements made previously that as an open item system, credits, receipts etc. must be applied to an invoice transaction.
The Tourplan system allows cash to be receipted where (e.g.) the apply invoice is unknown, or where a Tour Operator may receive cash in advance of bookings being made. When a receipt is posted to Unallocated Cash, the standard General Ledger postings for cash receipts are overridden. In a normal cash receipt transaction, the following General Ledger postings are made:
Credit Debtors Control
Debit Debtors Bank Account.
In the absence of an invoice to apply the payment against, the system does not know which (in the case of a system with multiple debtor control accounts) debtors control account to credit. A special Unallocated Cash Account must be created in the General Ledger and noted in the GL INI Settings and this account is used in instead of the debtors control account. The General Ledger postings made when the Unallocated portion of the receipt is issued becomes:
Credit Debtors Unallocated Cash
Debit Debtors Bank Account.
When the Unallocated Cash is applied to an invoice, the following posting occurs:
Credit Debtors Control
Debit Debtors Unallocated Cash.

|
Note that because of this special handling, the actual value of a company’s debtors is the sum of the balances of the Debtors Control Account(s), plus Unallocated Cash Account. |
Screen Shot 56: Unallocated Cash Dialogue
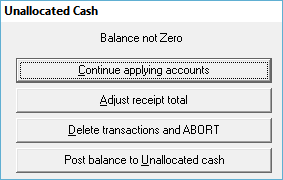
The dialogue displays when there is still an amount in the Unallocated field when the receipt transaction is saved.
Continue Applying Accounts (Button)
Clicking this button will re-display the New Receipt screen shown in Screen Shot 55 New Receipt – Applied Amounts. Already entered amounts can be edited, or additional invoices selected. This can be used if the Sav Button was clicked in error.
Adjust Receipt Total (Button)
Clicking this button will adjust the Receipt Total to be the same value as the Amount Allocated. This can be used if an incorrect Receipt Total amount was entered in the receipt header.
Delete Transactions and Abort (Button)
Clicking this button will cancel the receipt and remove any amounts entered.
Post Balance to Unallocated Cash (Button)
Clicking this button will create the applied receipt lines and then post the unallocated balance to the Unallocated Cash GL Account.
On completion, the Transactions List Screen is displayed.
Screen Shot 57: Transaction List Showing Receipt Transactions
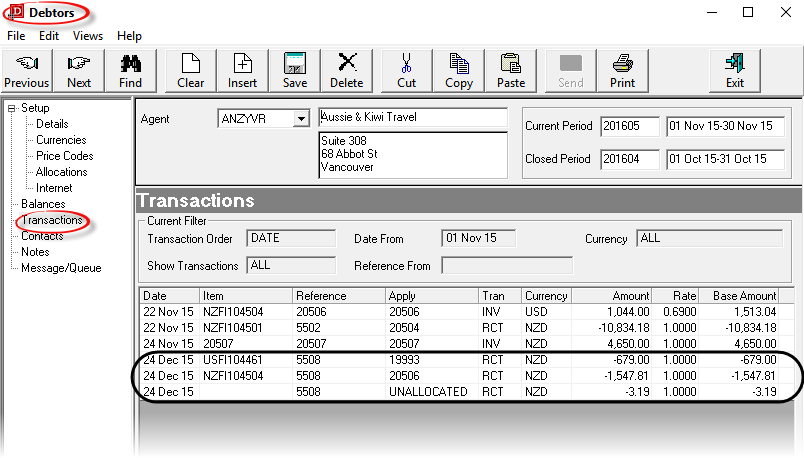
There are three lines for receipt 5508 - one each for invoices 19993 and 20506 and the balance posted to Unallocated Cash which has no apply number, since the Unallocated amount has not yet been applied to an invoice.
Quick entry mode requires that the invoice number(s) having a receipt applied to are known.
The Receipt Header screen (as in Screen Shot 52 Example Completed Receipt Header) is completed in the same way, and the Quick Entry Mode checkbox is ticked.
In this example the Invoice and Receipt are the same currency - NZD.

|
Click the Forward Button on the Wizard Bar to continue. The New Receipt screen overlays the Insert Transaction Screen. |

|
Click the Cancel Button to cancel the Receipt. |
Screen Shot 58: New Receipt – Quick Entry Mode
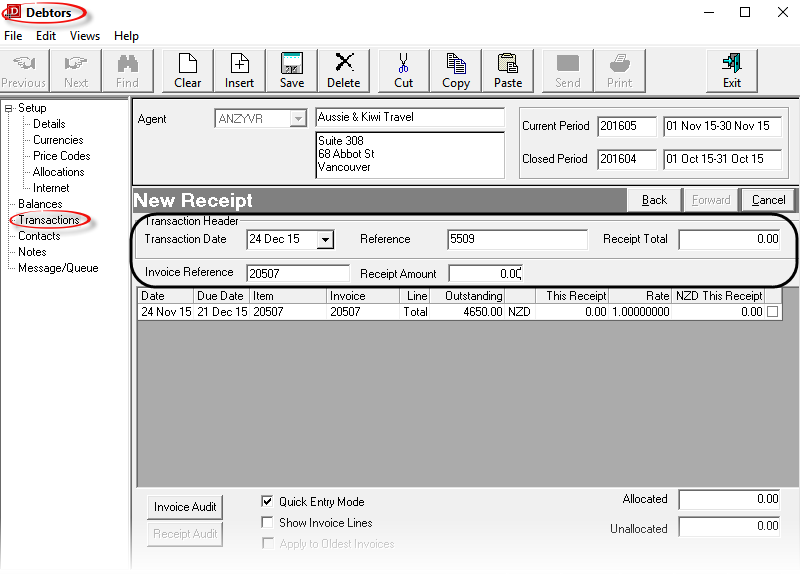
Transaction Date (Display Only)
The transaction date as entered in the receipt header.
Reference (Display Only)
The receipt reference (number) from the receipt header.
Receipt Total (Numeric, 11.2)
The receipt total from the receipt header. This can be edited here.
Invoice Reference (20 Chars)
When this screen displays, this field is empty. Enter the invoice Referencethat is to have the receipt applied against it and press Enter or click in the Receipt Amount field. The invoice line will display.
Receipt Amount (Numeric, 11.2)
The amount to be receipted can be entered here, or it can be entered in the NZD This Receipt column.
When the amount has been entered, additional invoices can be receipted by clearing the invoice Reference field and entering another invoice number.

|
When finished, click the Save button on the button bar to return to the Transaction list screen. |

|
If any item on previous screens need correcting, use the Back button on them Wizard bar. |

|
To cancel, click the Cancel button on the Wizard bar. |
Individual invoice lines are able to be receipted if necessary. This can be useful when a payment has been received which is to be paid to a specific supplier in a booking.
The Receipt Header screen (as in Screen Shot 52 Example Completed Receipt Header) is completed in the same way, and the Show Invoice Lines checkbox is ticked.

|
Click the Forward Button on the Wizard Bar to continue. The New Receipt screen overlays the Insert Transaction Screen. |

|
Click the Cancel Button to cancel the Receipt. |
Screen Shot 59: Receipt Individual Invoice Line
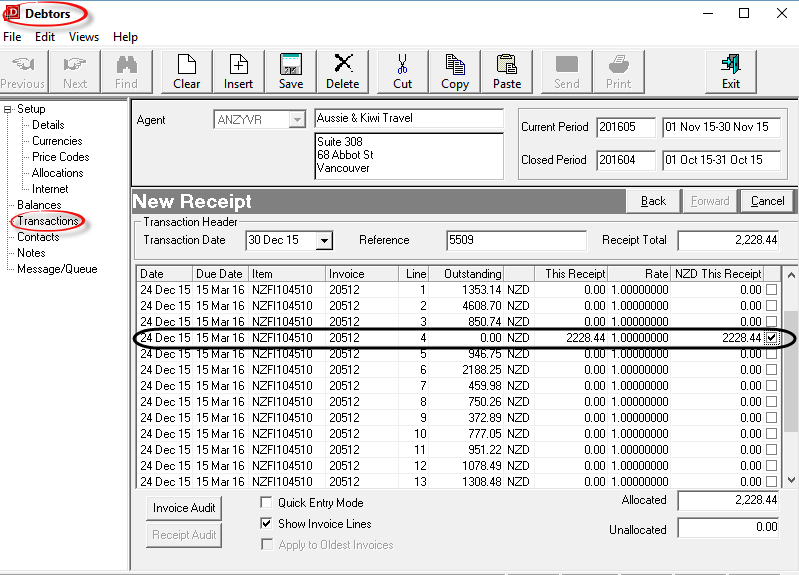
In Screen Shot 59 Receipt Individual Invoice Line Line 4 for NZD 2228.44 has been receipted. The procedure is the same as for receipting the invoice total. Enter the receipt amount in the CUR This Receipt column, or if the receipt amount equals the line amount, check the checkbox on that line.

|
When finished, click the Save button on the button bar to return to the Transaction list screen. |

|
If any item on previous screens need correcting, use the Back button on them Wizard bar. |

|
To cancel, click the Cancel button on the Wizard bar. |
This feature allows cash received in one currency to be applied to an invoice in a different currency.

|
To use this feature, the Debtors INI setting AR_RECEIPT_MULTI_CURRENCY must be set on. |
In this example a USD receipt is to be applied to an NZD Invoice.
The Receipt Header screen (as in Screen Shot 52 Example Completed Receipt Header) is completed in the same way. Ensure that
a) The correct transaction currency is chosen, and
Invoice 20750 inScreen Shot 60 Invoice List - Receipt Different Currency above has a balance of NZD $1734.00 outstanding. The Receipt total is USD $1245.00 which is going to be applied against Invoice 20750.
Screen Shot 61: Apply Receipt in

The exchange is displaying from the Tourplan currency rate table and is calculated as at receipt date. The exchange rate can be edited in this screen.USD $1245.00 has been applied and the exchange rate altered to reflect the rate obtained when the cash was banked..The Invoice shows an outstanding balance of NZD $7.47.

|
In the Transaction list screen, Receipts that have been applied in a different currency to the invoice will display the individual invoice lines that have been receipted, not the Receipt total. This is because the Receipt Exchange Rate is applied individually to each line as the receipt is generated. |
In the previous example of receipting in a different currency, an outstanding balance of NZD 7.47 remained on the invoice. This example will show how a receipt can be used to write this amount off.
Screen Shot 62: Receipt Header – Write Off Amounts
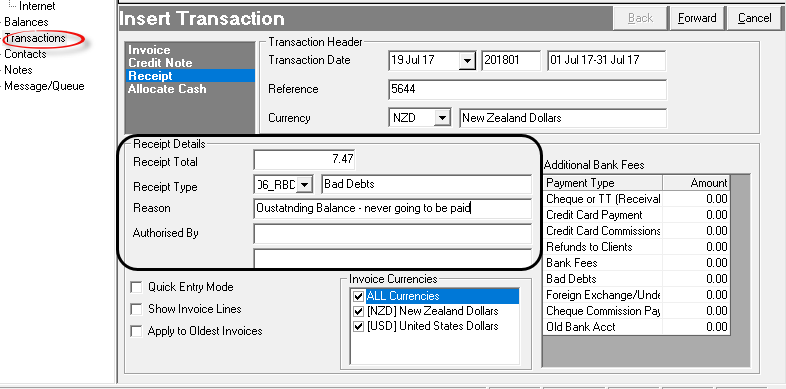
In the Receipt Header example Screen Shot 62 Receipt Header – Write Off Amounts, the currency has been selected as NZD (since that is the currency of the residual amount of the invoice), and the Bad Debts receipt type has been selected. In the set-up of this receipt type (CodeMaint > Debtors > Receipt Types in the System Setup Training Guide) the General Ledger Bad Debts Write Off Account has been attached. This means that the postings for this receipt will be:
Credit Debtors
Debit Bad Debts.

|
Click the Forward Button on the Wizard Bar to continue. The New Receipt screen overlays the Insert Transaction Screen. |

|
Click the Cancel Button to cancel the Receipt. |
Screen Shot 63: Invoice Lines–Write Off Receipt

The amount of NZD $7.47 has been applied to the invoice.

|
Bad debt amounts will display in the Tour Window as a transaction against the booking. This is because the Bad Debts receipt is a valid transaction in the booking. |

|
When finished, click the Save button on the button bar to return to the Transaction list screen. |

|
If any item on previous screens need correcting, use the Back button on them Wizard bar. |

|
To cancel, click the Cancel button on the Wizard bar. |
This feature enables the receipt to be issued and any fees to be posted at the same time. Two receipts are issued automatically; one for each part of the transaction.
In this example, outstanding invoice 20510 for NZD 10230.00 has been paid by telegraphic transfer to the bank, less a bank fee of 30.00.
Screen Shot 64: Receipt Header – Bank Fees and Receipt
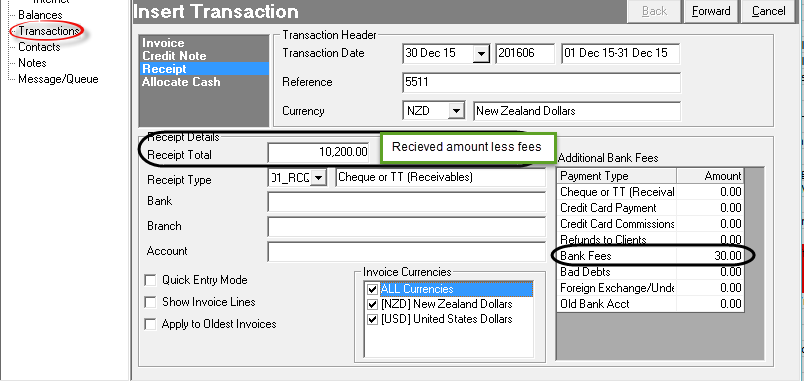
In Screen Shot 64 Receipt Header – Bank Fees and Receipt, the normal receipt type for this transaction has been selected from the Receipt Type drop-down and the net amount to the bank account has been entered as the Receipt Total - i.e., the amount received, less fees.
In the Additional Bank Fees section of the header, the amount of the bank fees has been entered against the Bank Fees Receipt Type.

|
Click the Forward Button on the Wizard Bar to continue. The New Receipt screen overlays the Insert Transaction Screen. |

|
Click the Cancel Button to cancel the Receipt. |
Screen Shot 65: Allocate Net Receipt Amount
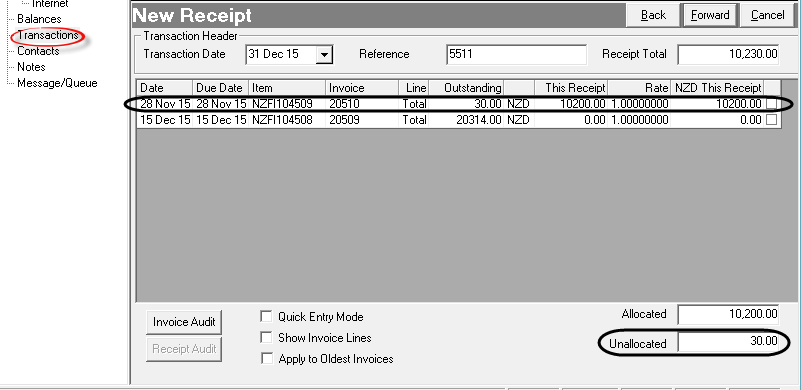
The net amount of the receipt to the G.L. Bank Account has been entered in the CUR This Receipt column.

|
The checkbox for the full amount cannot be checked in this example, since the system will allocate the full amount of 10230.00 to the receipt. The amount of 30.00 is outstanding, and Unallocated. |

|
This receipt has been given reference 5511. When the receipt is saved, the system will have automatically created a new receipt numbered 5512 for the Bank Fees component of the transaction. |
Screen Shot 66: Allocate Bank Fees Amount

The New Receipt Bank Fees screen displays and the receipt total of 30.00 has been allocated to invoice 20510, clearing the outstanding amount.

|
When finished, click the Save button on the button bar to return to the Transaction list screen. |

|
If any item on previous screens need correcting, use the Back button on them Wizard bar. |

|
To cancel, click the Cancel button on the Wizard bar. |
Screen Shot 67: Transactions Screen

In Screen Shot 67 Transactions Screen, it can be seen that receipts 5511 and 5512 have been applied to invoice 20510.

|
Bank Fee amounts will display in the Tour Window as a transaction against the booking. This is because the Bank Fee receipt is a valid transaction in the booking. |